

Download the image used in this tutorial
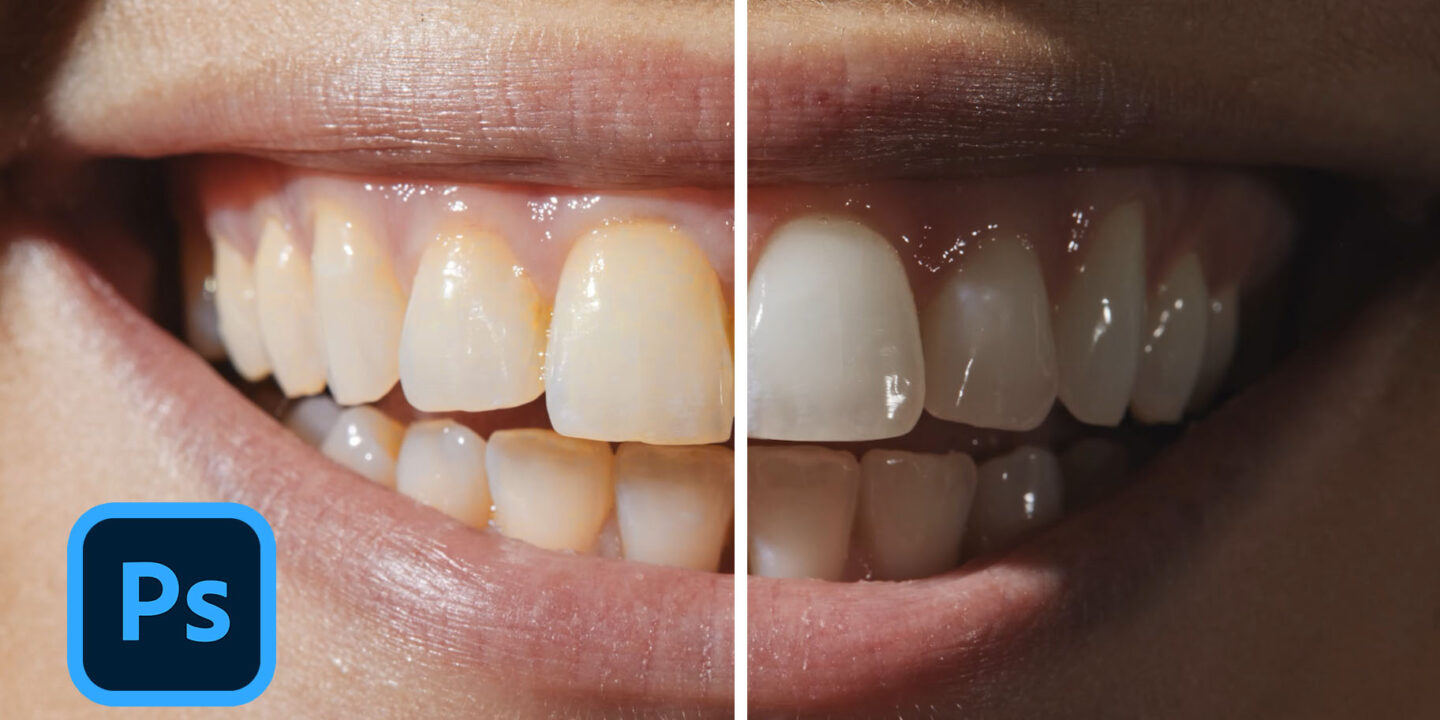
Hey Want to brighten your smile in photos? I’ve got the best, quickest way to whiten teeth in Photoshop. Let’s dive in and make those teeth shine!
Step-by-Step Guide: Whiten Teeth in Photoshop
Step 1: Add a Hue/Saturation Layer
– Shortcut: `Ctrl + U` (Windows) / `Cmd + U` (Mac)
– Go to the Adjustments tab and select Hue/Saturation.
Step 2: Target the Teeth Color
– Click the finger icon (targeted adjustment tool) in the Hue/Saturation panel.
– Click directly on the teeth in your image to select the color range that needs adjustment.
Step 3: Adjust Saturation and Lightness
– Lower the Saturation to reduce the yellow tones in the teeth.
– Increase the Lightness to brighten the teeth.
Step 4: Invert the Layer Mask
– Shortcut: `Ctrl + I` (Windows) / `Cmd + I` (Mac)
Step 5: Brush Tool Settings
– Select the Brush Tool (`B`).
– Shortcut to adjust brush size: Alt + Right Click + Drag Right (Windows) / Option + Control + Drag Right (Mac)
– Brush Diameter: 377 px
– Hardness: 46%
– Opacity: 100%
Step 6: Paint Over the Teeth
– Carefully brush over the teeth to apply the whitening effect.
– The white color on the mask will reveal the adjustments made in the Hue/Saturation layer.
Step 7: Adjust Mask Opacity
– Lower the opacity of the mask layer to blend the effect naturally with the rest of the image.
Concept Breakdown: Understanding the Technique
Alright, let’s dive into why we did each of these steps and understand the concepts behind them. If you want to follow along, you can download the practice image from Download the image used in this tutorial.
Using an Adjustment Layer
We started by adding a Hue/Saturation adjustment layer because we need to target the color of the teeth. The yellow tint in the teeth is what makes them look less white. By using the adjustment layer, we can isolate and modify this color without affecting the rest of the image.
Text Tip Box: Adjustment Layer
– Purpose: Allows for non-destructive editing of color and tone.
– Function: Adjusts specific colors and saturation levels in the image.
Targeting the Teeth Color
Next, we used the targeted adjustment tool (that little finger icon) to click on the teeth. This tool helps us select the specific color range we need to adjust—in this case, the yellow hues in the teeth.
Text Tip Box: Targeted Adjustment Tool
– Purpose: Selects and modifies specific colors in the image.
– Function: Click on a color in the image to adjust its hue, saturation, and lightness.
Adjusting Saturation and Lightness
We lowered the saturation to get rid of the yellow tint and increased the lightness to brighten the teeth. This step is crucial because it directly tackles the color issue.
Text Tip Box: Hue/Saturation Adjustment
– Purpose: Modifies the intensity and brightness of colors.
– Function: Decreasing saturation removes color, while increasing lightness brightens the image.
Inverting the Layer Mask
By inverting the layer mask (`Ctrl + I` or `Cmd + I`), we made the adjustments invisible, allowing us to apply the effect only where we want it. The layer mask controls which parts of the image are affected by the adjustment layer.
Text Tip Box: Layer Mask
– Purpose: Controls the visibility of an adjustment layer.
– Function: Black hides adjustments, white reveals them.
Brushing Over the Teeth
We used a white brush to paint over the teeth, revealing the adjustments and applying the whitening effect only to the teeth.
Text Tip Box: Brush Tool
– Purpose: Selectively applies adjustments to parts of the image.
– Function: White brush reveals, black brush conceals adjustments on the layer mask.
Adjusting Mask Opacity
Finally, we lowered the mask layer’s opacity to ensure the whitening effect blends naturally, making the teeth look white without overdoing it.
Text Tip Box: Opacity Adjustment
– Purpose: Blends adjustments smoothly with the original image.
– Function: Reduces the intensity of the adjustment layer’s effect.
